Step-by-Step Spring Cleaning Checklist
A step-by-step spring cleaning checklist is a great way to break down the process of resetting your home into more manageable chunks. You can refresh your home without getting overwhelmed along the way.

Where Do I Start?
A little bit of planning by creating a step-by-step spring cleaning checklist can help you avoid the stress and overwhelm. It’s not whole house cleaning. It’s step-by-step spring cleaning. You can do this!
1. Identify the areas that need extra attention in your step-by-step spring cleaning checklist.
You know your home better than anyone else and you know what’s been forgotten or neglected. If there are some things that need extra attention, make sure you add those specific tasks near the top of your list. If you use your stove often, you may need to clean your hood fan more than someone who uses their Instant Pot and barbeque all winter.
2. Schedule time to complete tasks and add it to your calendar.
Whether you use a written planner or the digital version on your phone, schedule the time you need. Spring cleaning doesn’t happen by accident. Decide on a realistic time of day to complete these tasks. It might be ten minutes every morning or the first fifteen minutes after your children go to bed.

3. Do it, just do it! Finish the task!
This is the non-negotiable part. You’ve set aside the time. You know what you need to do. You will build momentum each time you commit to that window of time you’ve set. (Come join our Facebook group – https://www.facebook.com/groups/884926662104674 – if you need support to stick with it!)
Declutter First!
You don’t have to do a full decluttering in order to spring clean a room, but there are some simple step by step spring cleaning suggestions you can follow to quickly tidy the space which will make the actual cleaning easier.
*Relocate what does not belong in this space. (And yes, random socks do seem to end up in every single room.)
* Put away anything that has a home. Pile it in a basket and take it all at once when you finish in that room if you find that easier.
* Clear away any seasonal things that have outlasted their season in that space. Fresh season means a fresh start! If you know you won’t use it again, add it to the donation pile now and don’t waste valuable storage space.
* If you come across a donation or sell pile, take action! If you just need to drop off, load it into your vehicle. If you are selling it, have you already posted it for sale or is it just not selling? Is it time to cut your losses and donate it?
* If you find any broken pieces, be honest about whether you will fix the item. If you have already replaced it, then out it goes!
If you have done any Swedish Death Cleaning, you’ll likely recognize some of these steps. Focusing on the important possessions in your home that you want to take care of is a better use of your energy than maintaining space for unwanted and used things.

Tackle One Room at a Time in your Step-by-Step Spring Cleaning Checklist!
Tackling one room at a time is an effective way to break it down into smaller steps. For those of us cleaning around family, this can be essential to avoid the additional challenge of working around people doing their own thing.
When starting out, pick one thing you can finish in one session to build some momentum. Maybe it’s cleaning out the junk drawer, cleaning out under one sink or clearing off the top of your dryer. Pick something visible that you will notice throughout the day and feel proud of (hint:this is not the time for washing your walls or wiping baseboards!)
Obviously, some things will be the same in all rooms – wash the walls, dust the ceilings, wipe down the light switches and railings, vacuum or mop floors, wash the windows, dust the window ledges. These are the final tasks, once the room-specific steps are completed.
Kitchen
For many of us, this is one of our busiest rooms. We clean it all the time, but this is surface cleaning. Spring cleaning is the time to go a little deeper. Get into those narrow spaces and cracks that get ignored in the everyday tidying up.
Light fixtures, Including Ceiling Fans.
Yes, I’m sure there’s a dried up bug in that closed ceiling fixture. It seems to happen in every house I’ve ever been in. It’s time to clean those lights.
With your ceiling fan, while you have it stopped to wipe down the blades, change the direction as well. Ideally, your ceiling fan should be turning clockwise all winter and counter-clockwise in the summer. This optimizes stirring the heat that gathers at the ceiling all winter but creates a cooling down draft all summer.

The Pantry
You’ve likely already gone through and purged any expired food and decluttered any unloved small appliances. That’s great! It’s not so crowded. Now you want to wipe down all the shelves and sweep the floor.
If you have canisters or jars on your shelves, take the time to wipe those down as well.
Shake your baskets over the garbage or vacuum them out. Those crumbs come out of nowhere.

Cabinets, Drawers and Hardware
You won’t really know how dirty your kitchen is until you are washing cabinet doors and squeezing out that rag. It makes a big difference.
Don’t forget the tops of your cupboards and the top of your fridge. The oils and moisture in the air from cooking make these surfaces a magnet for dust and grit.
If you have a large kitchen, don’t hesitate to break this into two steps in your step-by-step spring cleaning if it works better for your energy or time limits. You can do upper cabinets one day and save lower cabinets for the next one.
Appliances, Including the Range Hood Fan
Maybe you are ahead of the game and cleaned your fridge and freezer before Christmas. Check if it is still clean. Don’t forget to vacuum off the coils on your refrigerator if they are exposed. Take the time to pull out your fridge (and the oven) to sweep underneath.
With your range hood fan, remove the filter and soak it in hot, soapy water. If it’s really greasy, you can add ¼ cup of baking soda and soak for 10-20 minutes. Scrub with a non-abrasive brush. Rinse well and dry before replacing.
Since you are at the stove, remove the knobs and scrub them off as well. Wipe out or vacuum that drawer beneath the oven. It becomes a trap for crumbs.
If you want to tackle your oven, go for it. I like to wait for a day when I can open all the windows for that. It might or might not be during spring cleaning.
If you have a dishwasher, you may need to clean the filter in the door. (Check your manual online to locate the filter if you don’t know where it is.) It’s also a good time to run a dishwasher cleaner through your machine. There are liquid options or tablets that work in a hot cycle while the dishwasher is empty.
The great thing about including big appliance tasks in your spring cleaning is that you’ll remember exactly when these tasks were last done.

Under the Kitchen Sink
This is an easily neglected spot. Whether you keep the garbage, cleaning supplies or tin foil and Ziploc bags there, it’s time to go through it. Declutter it and clean up. It has been forgotten long enough.
Wash your garbage can. Get it soapy and give it a good scrub. Do the same with your recycling bin if you have one under your sink.
Kitchen Fire Extinguisher
An important part of the step-by-step spring cleaning checklist is to check the expiration date on your fire extinguisher if you keep one in the kitchen. It’s an important safety tool to have in your home and kitchen.
Rechargeable fire extinguishers need to be replaced every twelve years and recharged every six years. Replace non-rechargeable ones every ten years.

Living Room
Spring cleaning your living room is really about soft surfaces.
Wipe down soft lampshades with a damp microfibre cloth. You can wipe down leather furniture as well.
Wash removable pillow covers. If you can leave the pillow inserts outside in the sun for a few hours on a not-too-humid or windy day, this will help air them out and eliminate any trapped moisture before you put the cover on again.
Take any area rugs outside and shake them out. Like the pillows, moisture can hold onto grime in your rugs. Give them a second vacuum after you’ve had them outside.
Don’t be surprised if you find cleaning changes your perspective on what you want to keep. Sometimes decluttering creeps into cleaning when you realize you don’t want to spend the time and energy to maintain an item. Maybe it goes straight into the donation box or to a family member if it was something you’d deemed important in Swedish Death Cleaning.

Entryways & Closets.
This is the time to empty the floor of the closet and sweep or vacuum it out. Find out what’s at the bottom! If you have a storage bench, open it up and give it the same treatment.
Similar to the pantry, you want to wipe all shelves and vacuum out baskets. Do not neglect wiping all handles and doors. You know where everyone puts their hands to push the door closed or leans while putting shoes on and off.
This is one space that really benefits from removing the out of season items before you start the deep cleaning.

Bathrooms
If you have more than one bathroom, tackle one at a time.
Shower Curtain & Liner
It’s time to remove that shower curtain and liner and give them a wash. Most are machine washable, but if yours is not, then you can wash it by hand with a mild detergent in the tub. Add a cup of vinegar to your washing machine to deal with any lingering mold or mildew on your curtain.
Wash your bath mat as well.
Towels
If you’ve noticed that your towels are not as absorbent lately, spring cleaning is the perfect time to strip them of built-up detergent or hard water deposits. (Fabric softeners and dryer sheets reduce towels absorbency as well.) Add ¼ cup of borax and ¼ cup of washing soda to your washing machine’s hot cycle and let your towels soak for a while before allowing the cycle to rinse and spin.

Bathroom Exhaust Vent
Don’t forget to clean the vents for the exhaust fan in your bathroom. Look up there. Odds are good the cover has dust all over it.
For safety, you can turn off the power at the electrical box while you clean this. Remove the cover and wash it. The fan blades and motor housing may benefit from a good dusting or vacuum.
Consult your manual online if you aren’t sure how to clean it.
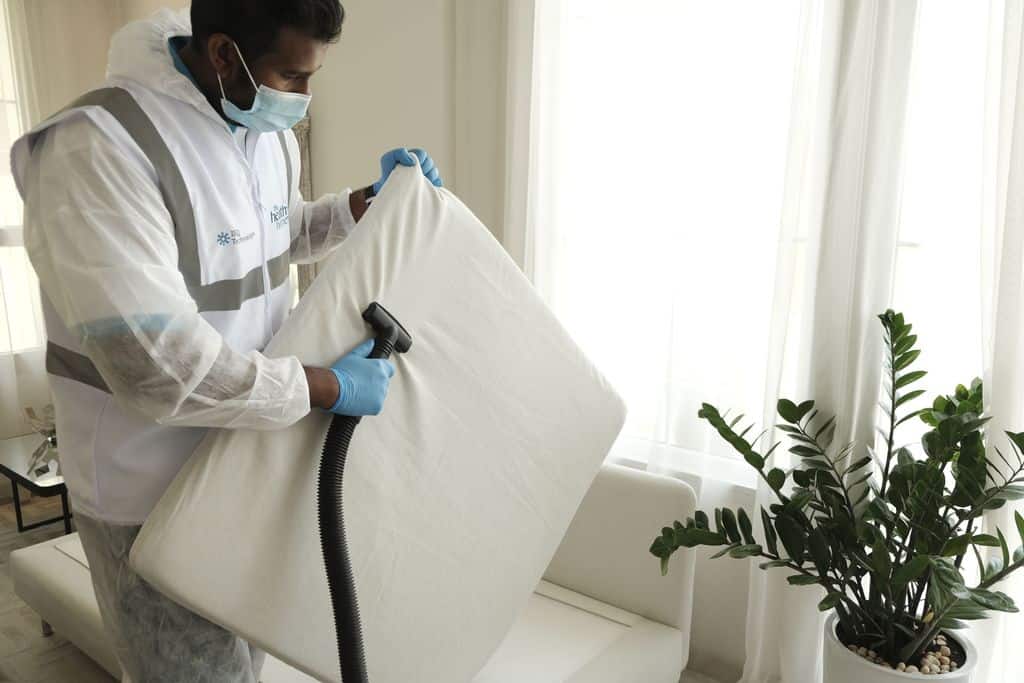
Bedrooms
This is the perfect time to switch over your bedding. If you use a lighter duvet during the warmer months or different sheets, make that change.
While your bed is bare, take some time to inspect the mattress. You can vacuum the surface to get rid of dust, hair or pet dander. (It gets everywhere!). If you have to spot clean any discoloured spots, let those dry fully before making your bed again.
This is a good opportunity to rotate your mattress for more even wear. Most modern mattresses do not need flipped but rotating is good. (Ask for help with this. It’s not a good one-person task.)
Do not neglect your window coverings. Check the tags on curtains for care instructions. Some are machine washable and some are not. Vacuum your fabric blinds or wipe them with a damp microfibre cloth. Wash plastic or aluminum blinds with a wet rag or soak them in the tub if you can take them down.
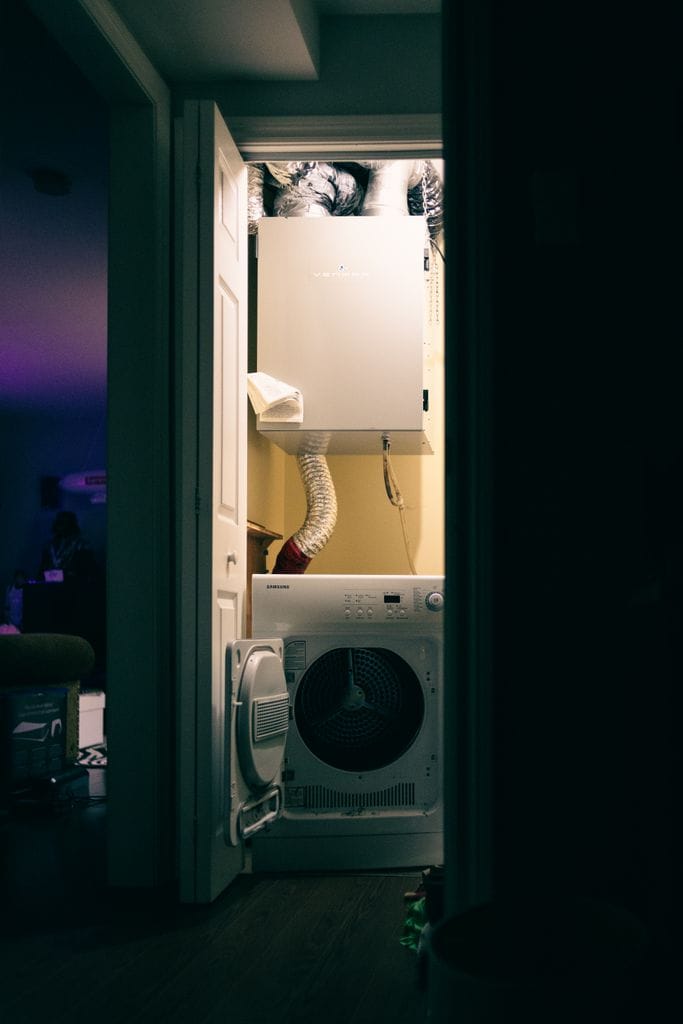
Laundry Room or Laundry Space
If you do only one step of your step-by-step spring cleaning in your laundry room, make it to clean the dryer vent. Pull out your dryer and pop off the hose on the back. Vacuum that out. Lint from the dryer builds up everywhere.
Next time you have your ductwork cleaned by a professional, ask them to do the dryer vent as well. It’s a major cause of house fires.
If you have a front-loading washing machine, take a few minutes to wash down the gaskets around the door. The pump filter on front-loading machines needs to be cleaned periodically; check your manual online if you aren’t sure how to access it.
Like your dishwasher, you can buy cleaning tablets to toss into the washing machine which will assist with removing any buildup of detergent or fabric softener.
Clear off the shelf or counter with the laundry soap, stain remover and other laundry essentials to wipe it down.
A Few Other House Notes in your Step-by-Step Spring Cleaning
Check your furnace filter and replace it if needed. Replace your furnace filter every 90 days; if you use a disposable one, write the date on the edge. It’s a quick task to cross off your list.
Does your water softener need more salt? Have you scheduled the annual inspection of your water heater?
Test your smoke alarms and your carbon monoxide detector. Replace the batteries if needed. Wired and battery alarms need to be replaced every ten years.
Dump your vacuum canister. You’ve been doing such a fantastic job cleaning your house that it’s probably due to be done.
It’s been a long winter. Go into the new season in a comfortable, clean home. Follow this step-by-step spring cleaning guide and work your way through your house. You got this!